Wednesday, March 31, 2010

Secondhand Fashion Week - Day Four and An Introduction

On the Town


Necklace - Etsy

Shirt - Made by me

Bangles - Gift from a friend

Cardigan - Consignment Store
(Same as yesterday)

Bag - Yard Sale
Condition: New with tags
Brand: Vera Bradley
Price: $2.00

Sterling Silver Bead Bracelet - Yard Sale
Condition: Very Good/Used
Price: $1.00

Pants - Consignment Store
Condition: Good/Used
Brand: Sonoma
Price: $5.00(?)

Shoes - Yard Sale
Condition: New without tags
Brand: Pazzo
Price: $1.00

I'm afraid I don't have any tips or tutorials for you today (don't worry, I have one planned for tomorrow) but...

Look who came out of hiding:


I would like to introduce Bella. She is a two-year-old Bengal who was in need of a new home. We brought her to ours on Monday. She is still a little unsure of us. Coming out of a home with one person and into a home with eight was a big transition for her! She seems sweet, a little frightened and very, very small, especially in comparison to our last cat who was over twenty pounds!

See you tomorrow!

Tuesday, March 30, 2010

Secondhand Fashion Week Day Three

Vintage Inspired


(Olivia insisted on being in the picture!)

Dress - Made by me

Cardigan - Consignment Store
Condition: Good/Used
Brand: George
Price: $2.00 (?)

Sterling Silver Ball Earrings - 
Yard Sale

Spoon End Pendant - 
Yard Sale


I'm afraid I don't have a tutorial for you today but I do have this...


Don't throw away those pretty cardboard clothing tags (not that you shop in regular stores *wink*) because they make great little bookmarks!

I also have this...


These little boots were Cole's and then they were Emma's...


and then they were Mary Laurence's and then Olivia's...


and now they're Georgia Beth's.

(Oh, and her dress came from a yard sale.)

Perhaps tomorrow (or the next day, it depends) I will be able to share a picture of our new arrival. Right now she spends most of her time in hiding and when she does come out she will not condescend to show us more than a quick flash of her tail. But she'll get used to us, by and by.

Monday, March 29, 2010

Secondhand Fashion Week Day Two and Dress Shirt Pillow Tutorial

Secondhand Fashion Week:
Day Two - The Polished Teacher
(Well, I try!)


Emma is turning out to be a very good photographer, don't you think?

Earrings - Belk's
Necklace - My mother : )
Ring - Gift Shop
Shoes - Belk's

Blouse - Yard Sale
Condition: Very Good/Used
Brand: Ann Taylor Loft
Price: $1.00

Skirt - Consignment Store
Condition: Good/Used
Brand: Willi Smith
Price: I think it was $7.00

I don't usually pay that much for an item when thrift shopping but I have this thing with linen skirts, I have, like, seven of them!

Today was rather busy. I have more students on Monday than any other day of the week! I must say I am glad to be sitting back, relaxing, typing this post and listening to music from such films as Penelope, Robin Hood (bet you didn't know there was a soundtrack!) and Master and Commander. Now, on to the tutorial!

Dress Shirt Pillow Tutorial

Supplies:


Enough Scrap Fabric to cut nine 5" squares
A fairly large (woman's medium and up) Button Down Shirt
Straight Pins
Scissors
A 14" square pillow form
Sewing Machine and Thread
Iron and Ironing Board
A Rotary Mat and Cutter or A piece of Paper cut to 5" square

Instructions:

Seam allowance is 1/4 inch.

1) Cut out nine 5" squares from your fabric using either your mat and cutter or your paper pattern.


2) Arrange your squares in a pleasing manner.


3) Begin sewing them together one row at a time starting with the top row and working your way down...


until all three rows are sewn.


4) Press your seams. You should press the seams of the top and bottom row towards the inside and the seams of the middle row towards the outside.


5) Begin sewing your rows together. Making sure to match and pin your seams.


6) Press your seams towards outside.


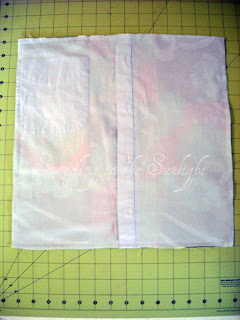
7) Button up your shirt and press the front. Place your patchwork on top centering it over the buttons. (Note: you will have cut two pieces from the shirt but you only want the one with the buttons.)

8) Pin your two squares together and sew all the way around the outside edge.


9) Clip diagonally across each corner being careful not to cut your stitching.


10) Unbutton your shirt and turn your pillowcase right side out.


11) Use the point of your closed scissors to gently poke out the corners.


12) Insert your pillow form!


Sunday, March 28, 2010

Secondhand Fashion Week Day One and Ribbon Headband Tutorial

Secondhand Fashion Week:
Day One - French Couch
(According to Eady at least!)

I have been looking forward to this event! Lillian was over on Friday and helped me put together my outfits for the week. Here is today's:


It was very windy today!

Headband - Made by me (see below!)
Earrings - Belk's
Necklace - Target
T-shirt - TJ Maxx

Jacket - Thrift Store
Condition: New with tags
Brand: Fundamental Things
Price: $5.00

Skirt - Consignment Store
Condition: New with tags
Brand: Old Navy
Price: $3.50

Shoes - Church Clothing Exchange
Condition: Used/Good
Brand: Jazberry
Price: Free

Little background story on the jacket: I was shopping at a thrift store with Lillian and Eady. Eady held up a jacket and asked "didn't I like it?!". She meant it as a joke and was quite surprised when I actually bought it!

Ribbon Headband Tutorial

Supplies:


Ribbon (approx. 3/4 yard for the single ribbon headband)
A thin, stretchy Ponytail Holder
Tape Measure
Scissors
Sewing Machine and Thread

Instructions:

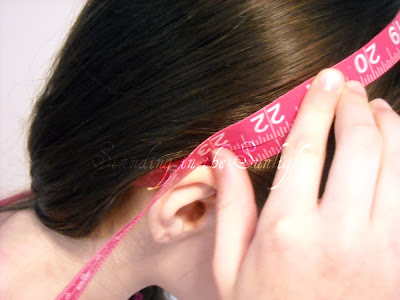
1) Measure around your head at the widest point passing the tape measure underneath your hair.


2) Subtract two inches from your measurement. Cut your ribbon this length.


3) Fold under one end of your ribbon about 1/4 inch. Place the ponytail holder on top of the ribbon having it even with the folded over edge.


4) Fold the end over again about 1/4 inch folding it over the ponytail.


5) Sew over the ribbon close to the folded edge several times.


6) Repeat steps 3 - 5 for with the other end of the ribbon being careful not to twist it.


The finished headband should look something like this:


For the double ribbon headband cut two pieces of ribbon the same length. Place one on top of the other and treat them as one piece following the same instructions.


I'll see you tomorrow!

Saturday, March 27, 2010

This Week...

 "Then the cloud covered the tent of meeting, and the glory of the LORD filled the tabernacle. And Moses was not able to enter the tent of meeting because the cloud settled on it, and the glory of the LORD filled the tabernacle. Throughout all their journeys, whenever the cloud was taken up from over the tabernacle, the people of Israel would set out. But if the cloud was not taken up, then they did not set out till the day that it was taken up. For the cloud of the LORD was on the tabernacle by day, and fire was in it by night, in the sight of all the house of Israel throughout all their journeys."

-Exodus 40:34-38

As the Lord was present in the tabernacle so is He present in the temple of our bodies. As He led the Israelites on their journey through the wilderness to Canaan so He leads us on our journey through the wilderness of sin to Heaven. As He leads so we should follow.

.  .  .  .  .  .  .  .  .  .

Just a little note: next week I will not be posting either "I *Heart* Wednesday" or "This week..." as I am planning to participate in Amanda Beth Online's Secondhand Fashion Week. Also, because my secondhand wardrobe isn't exactly very large I will be posting either a DIY tutorial or a re-purposing tip everyday along with my outfit. See you tomorrow!

Friday, March 26, 2010

Outdoor Activity

I hope you have all been enjoying the Spring weather! We certainly have! Here are a few pictures of the little girls making pine cone bird feeders.


Thursday, March 25, 2010

I *Heart* Wednesday

I *heart*...

my new pattern,


this necklace,


Emily's latest photo series,


these earrings,


and Benadryl.

I *heart* Benadryl because without it I couldn't *heart* Spring.